Mealtime Partners Hydration Backpack Drinking System with Drink Tube Positioning
Use and Maintenance Instructions
A Hydration Backpack Drinking System with Drinking Tube Positioning consists of: a canvas backpack; a bladder that is fitted with a drinking tube that has an on/off valve and a bite valve (i.e., the mouth piece) at the end of the tube; a mounting clamp; and a 24 inch length of flex-tube. The bladder is positioned inside of the backpack and the tubing from the bladder is inserted first through a guide loop in the mounting straps of the backpack, and then through the flex-tube. The bite valve is attached to the end of the drinking tube (after it has been run through the flex-tube). The backpack straps are hooked over the handles of the wheelchair and the mounting clamp is firmly attached to one of the wheelchair handles. This allows the tube from the bladder and the bite valve to be positioned close to the user’s mouth using the flex-tube which allows a user to consume liquids, hands-free.
Proper care of the drinking system is important for it to function correctly and for its long-term durability. Hydration backpacks come fully assembled but will require disassembly for cleaning and maintenance. Figure 1 shows the parts of the drinking system.
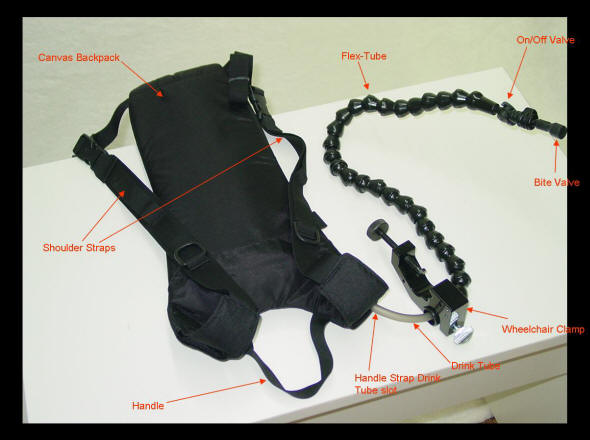 |
| Figure 1: The Components Comprising the Hydration Backpack with Drinking Tube Positioning |
Disassembly and Re-assembly
To disassemble the hydration backpack, remove it from the wheelchair and place it on a flat surface with the shoulder straps facing up.
Flex-tube Removal:
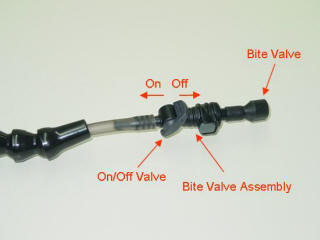 |
| Figure 2: The Bite-Valve Assembly |
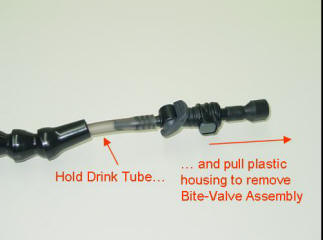 |
| Figure 3: Removing the Bite-Valve Assembly |
Figure 2 shows the components of the bite-valve assembly. Flex-tube removal requires removing the bite-valve assembly. To remove the bite-valve assembly, firmly grasp the bite-valve assembly and gently pull as indicated in Figure 3. The drinking tube should slide out of the flex-tube a few inches. Holding the drinking tube with one hand and the on/off valve with the other, remove the drink tube from the end of the bite-valve assembly. (The first few times the drinking tube is removed this process will be somewhat difficult as the tube is new and firm. If it proves to be too difficult, soak the end of the drinking tube and the bite-valve assembly in very hot water for several minutes). After the drinking tube is removed from the bite-valve assembly, pull the flex-tubing off of the drinking tube. The wheelchair Clamp will still be attached to the flex-tube. Separate the flex-tube from the clamp by turning the thumb-screw on the clamp counterclockwise. Set the wheelchair clamp and the flex-tube aside temporarily.
The bladder and drinking tube can now be removed from the backpack. With the back of the backpack facing upward
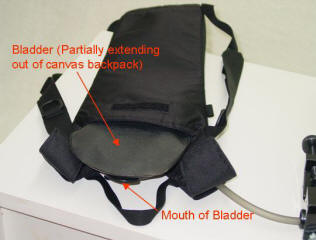 |
| Figure 4: Bladder Emerging From the Canvas Backpack Opening |
 |
| Figure 5: Bladder After Removal From Canvas Backpack |
on a table, pull up the flap at the top of the bag. (It has Velcro holding it closed.) Before removing the bladder, note that the mouth of the bladder and the drinking tube both face towards the front of the backpack and downward towards the table surface as shown in Figure 4. Figure 5 shows the entire bladder after it is removed from the canvas backpack. This is important for reassembly. The drinking tube will easily slide out of the slot that holds it in the shoulder strap.
Reassembly:
After cleaning, to reassemble, reverse the above Steps. Once the bladder has been filled (see “Filling the Bladder” below) insert the bladder into the backpack orienting the mouth of the bladder towards the front of the backpack. Make sure that the drinking tube extends upward from the bottom of the bladder with no kinks in it and that the bladder is inserted fully into the backpack and is lying flat in the bag. Once the bladder is inserted, thread the drinking tube through the slot in the shoulder strap and then through the flex-tubing. Both of the mounting straps have a slot in them allowing the drinking tube to come out to either the left or right side of the user, depending upon their preference. Be sure to insert the drinking tube through the flex-tubing starting at the open end that does not have a taper on it. It is helpful to straighten the flex-tube prior to running the drinking tube through it. Should the drinking tube stick while it is being inserted through the flex-tube, rotate the flex-tube slightly to help the drinking tube slip through freely. Replace the bite valve and on/off switch assembly into the end of the drinking tube. The system is now ready to be mounted.
Filling the Bladder with Liquid
The hydration backpack bladder is filled through the bladder mouth, i.e., the opening located on the front of the bladder. Unscrew the bladder cap (the cap has a small plastic tab that keeps it attached to the bladder). Pour water (and ice) through the bladder's mouth. Screw the bladder cap back onto the mouth to form a tight seal. While it is not necessary to completely fill the bladder, if you do not, it is a good idea to remove excess air by moving the on/off switch to the on position and squeezing the bite valve to vent air from the bladder.
Mounting on a Wheelchair
Once the hydration backpack bladder is filled with liquid and excess air has been vented from the bladder, the backpack can be mounted on a wheelchair.
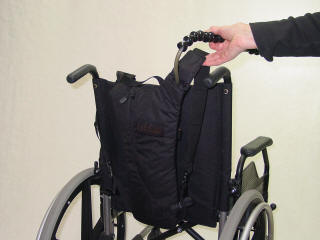 |
| Figure 6: Looping the Backpack Shoulder Straps over the Wheelchair Handles |
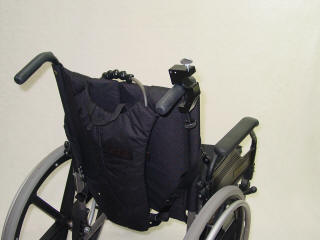 |
| Figure 7: Attaching the Clamp to the Wheelchair Handle |
Loop the shoulder straps on the canvas backpack over the wheelchair handles as shown in Figure 6. If excess canvas strap fabric hangs down from the mounting straps, wrap them in a small bundle and put a rubber band around them to hold them compactly in place.
Once the backpack is in position, the Wheelchair clamp should be attached to one of the wheelchair handles. Position the wider opening of the clamp around the handle with the knob screw positioned vertically. Tighten the screw until the clamp is firmly attached to the handle. The clamp should be positioned with the second, smaller clamp opening, on top of the handle as shown in Figure 7.
Loosen the thumb-screw on the top of the clamp until none of the threads are visible inside the clamp opening. Slide the flex-tubing into the clamp opening from the front of the wheelchair to the back as pictured in Figure 8.
After one link of the tubing is in the clamp and the indent in the flex-tubing is aligned with the thumb-screw, tighten it until the tubing is held firmly in place. Details of this positioning are shown in Figure 9. Make sure that the clamp is mounted vertically so that it does not stick out from the chair as it might damage walls, etc., when the chair is in motion.
Position the bite valve for easy access by the user by bending the flex-tube. It will retain any position in which it is placed.
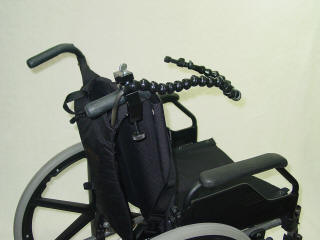 |
| Figure 8: Flex-tubing Positioned in Clamp |
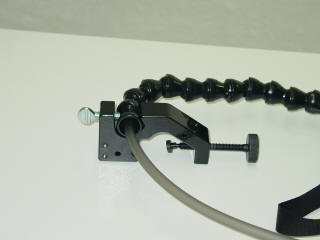 |
| Figure 9: Details of How Flex-tube is positioned in Clamp |
Cleaning & Storage
Rinse out the bladder, tubing and bite valve with warm water after each use. The most important part of long-term maintenance is drying the unit fully between uses. Moisture breeds bacteria and mold. Dry the bladder with a paper towel and make sure that the bladder is open to the air and is fully dry before storage. Hang the drinking tube to allow all water to drain from it and let it dry. The remaining parts, the on/off valve and the bite valve, should be air-dried on a clean surface.
For more thorough cleaning, wash the bladder, drinking tube, and bite valve assembly, with a few drops of liquid dish soap and warm water. Do not use hot water. Use a foam paintbrush to gently cleanse the interior of the bladder being careful not to damage it. The large bladder mouth opening accommodates this. Flush the bladder with clean, warm water after each scrubbing. The rinse water should run clear and soap-free throughout the bladder. Rinse all of the other parts in the soapy water and then with warm clean water until no soap remains. Dry all parts as described in the previous paragraph.
Deodorize and disinfect the hydration backpack bladder, tube and bite valve assembly on a regular basis. Soak the bladder, tube and bite valve assembly overnight in warm water with 2 tablespoons of bleach and at least 4 gallons of water. (For mixing purposes, that is 1.5 teaspoons per gallon of water.) The next day, gently scrub, rinse and flush out each part until fully clean. Leave the bladder with the mouth unscrewed to completely dry. For additional cleaning and deodorizing, fill the bladder with water and 2 teaspoons of baking soda. Massage the mix throughout the bladder and the tubing and allow it to sit overnight. Rinse thoroughly with warm water.
Wash the canvas backpack in cold water. Use a mild cleanser to remove stains, deodorize and disinfect. Soak for around 30 minutes, if necessary. Flush the pack with cold water and hang to dry. Never put your hydration backpack in the washing machine or clothes drier, as this will potentially damage the pack.
Reassemble the clean, dry hydration backpack components. Hang pack on a hanger and store in a clean, dry place between uses.
Tips & Warnings
Avoid sugary drinks in your hydration backpack bladder, because sugary drinks (such as Gatorade, juice or soft drinks) increase the growth of bacteria and make cleaning the hydration backpack more difficult.
Be careful when using strong cleaning agents (such as bleach) on hydration backpack components, as harsh solutions can harm the plastic. Never use more than 2 tablespoons of bleach mixed with at least 4 gallons of water to wash or soak the hydration backpack.
Fully rinse and clean all hydration backpack parts after each use to promote healthful use and ensure user safety.
Hydration backpack parts that reveal discoloration may need replacement. .
VIEW COMPLETE DRINKING PRODUCT LIST
This page last updated 1-17-2019